inelement207
New member
DIY brake pad/rotor replacement 2010 WRX 5DR (GH chassis)
Purchase rotors/pads of choice when shopping take heed to this quote about vented/slotted rotors (tires matter). I choose a set from rockauto for a steal powerstop K4077 w/z16 ceramic pads.
1/2" breaker bar
1/2" ratchet
3/8" ratchet
19mm 1/2" drive socket
17mm 1/2" drive socket
14mm 1/2" drive socket
14mm 3/8" drive socket
13mm 3/8" drive socket
Flat head screw driver
3 lb. Sledge
3/16" punch or close to w/ at least 6 in shaft
10ml syringe or other small suction device i/e turkey baster
jack/jack stands etc etc
Supplies:
Pads/Rotors (shoes if doing e brake)
PB blaster
Brake cleaner
Disk brake Quite if used
Disk brake caliper lube
Whiteout
Loctite red if used
M8 - 1.25 x 20mm grade 8 QTY 2
Disclaimers: I did not use torque wrench, use one. I did not use loctite suggested for safety. Wear gloves I don't. Paint on braking surface may or may not harm new pads up to you.
Procedure:
1) Lift up the vehicle, and remove the front/rear wheels. OEM lugs are 19mm. I used cross member/rear diff to jack + rocker pinch points for stands.
2) Soak what you can in PB bolt heads, rotor/hub surface etc
3) I suggest work one wheel at a time in case you forget how things go back together especially important with drum brakes!
Start with fronts remove 14mm caliper body bolts. These bolts should remove easily with 3/8" ratchet, the caliper guide pin is keyed to the caliper body so it "shouldn't" spin. Rust changes everything.

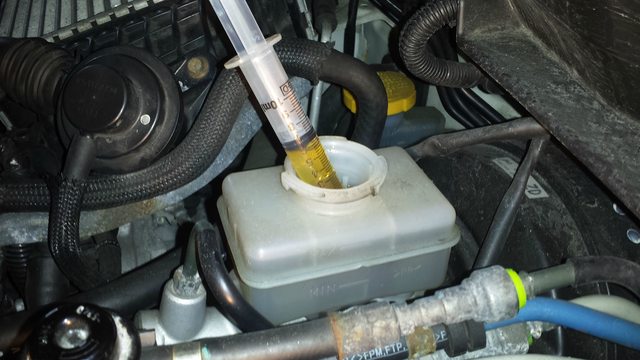
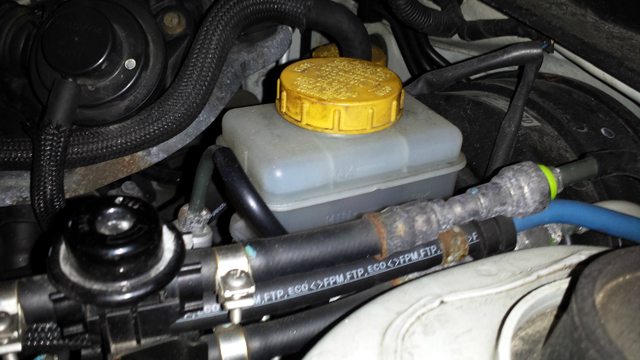
4) Open the brake fluid reservoir cap/remove screen. Remove caliper body, some manual compression may be required to loosen. With caliper body removed use a zip tie to hang body from strut/spring.
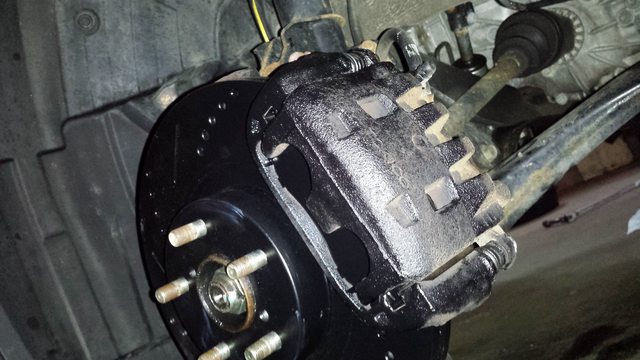
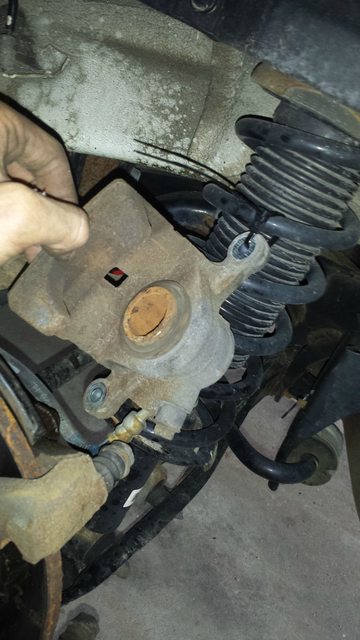
5) At this point compress the pistons, image shows fully returned pistons. Use channel locks or c clamp with wood or old brake pad. Make sure as you clamp the piston boot is not damaged/folds incorrectly. Once complete check for excess fluid level in reservoir as paint and brake fluid do not get along.
6) Remove old brake pads if not already done. If not choosing to replace rotors be careful to not hurt rotor surface when prying pads loose from pad clip/caliper bracket. Remove pad clips.
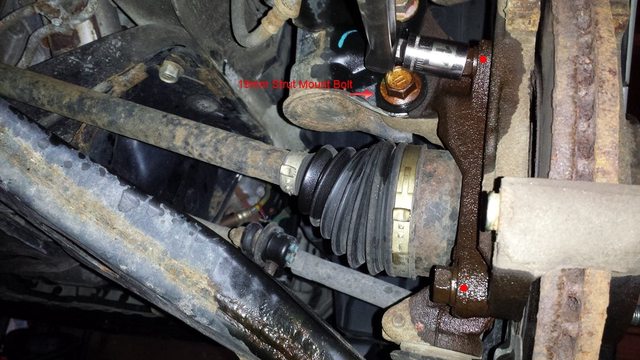
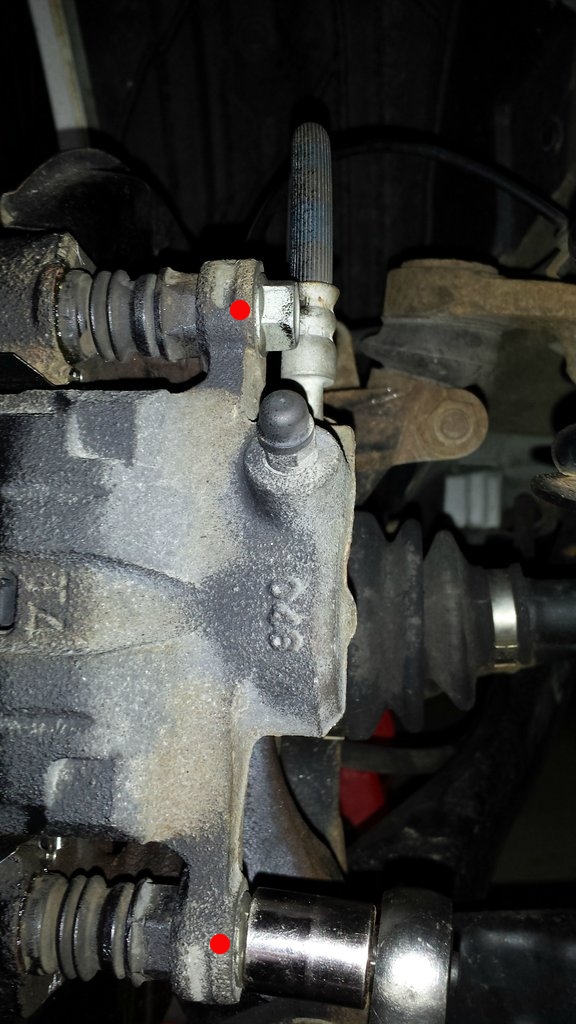
7) Remove caliper support. Two 17mm bolts attached to knuckle. Here I removed the lower strut mount bolt for better access to the top caliper support bolt. DO NOT remove the top strut bolt it is for camber adjustment.
19mm strut mount bolt removal
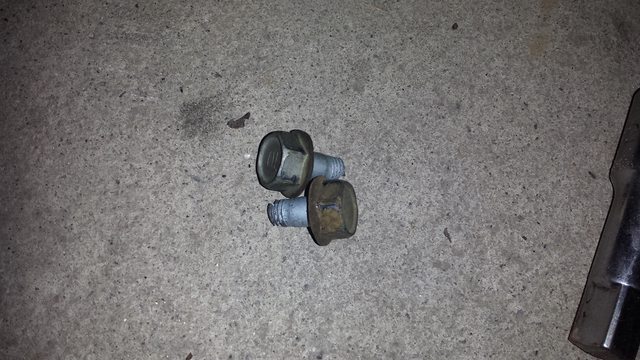
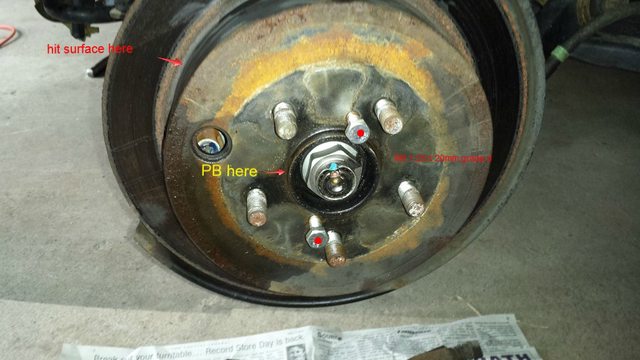
8) Remove rotor. Soak center hub with PB. Use M8 - 1.25 x 20mm grade 8 in threaded holes of rotor body. Some light persuasion on the rotor with a sledge can help bust up rust, heat/PB as well, hit at your own risk damaging hub bearings can occur. Only hit on the flat section adjacent to the braking surface if force is required.
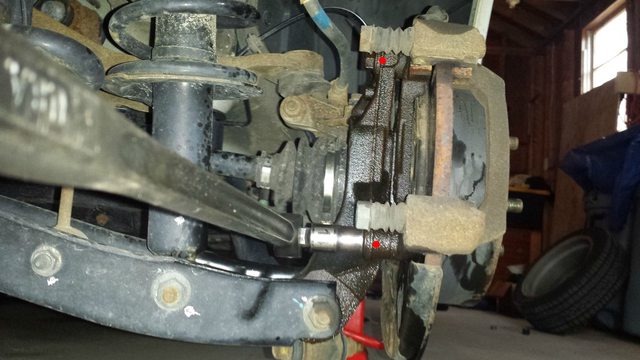
rear rotor shown in image
9) Reassemble. Install rotor. Install caliper support torque value: 80 N·m (8.2 kgf-m, 59 ft-lb). Replace lower strut bolt if removed torque value:155 N·m (15.8 kgf-m, 114.3 ft-lb).
10) Install new pad clips in caliper support. I took a extra step and bent over all the ears on the clips to make sure they did not walk. A punch works well.
11) Install brake pads. Ensure shims are attached. Apply disk quite if preferred. Inner pad always has the indicator attached.
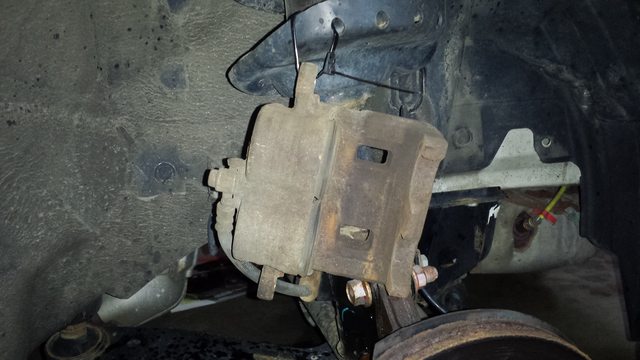
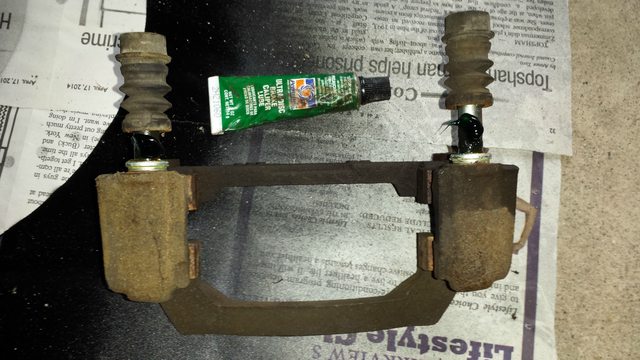
12) Grease caliper piston boots if preferred. Inspect/clean/grease caliper guide pin bolts.
rear caliper support shown
13) Install Caliper Body. Ensure shims do not fall off of brake pad. Tighten 14mm bolts torque value: 27 N·m (2.8 kgf-m, 19.9 ft-lb).
14) Repeat procedure for other side front. Now may be a good time to use white out on bolt heads to ensure they are not loosening after install. It is for me at least as I do not take the time to pull the torque wrench out I just tighten to feel.
Rear pad/Rotor replacement
15) Remove 14mm caliper body bolts. Rear caliper body bolts may require the use of a wrench on the caliper guide pin to prevent spinning, I believe it is a 19mm. Remove caliper body, again some manual compression may be required to help body come off. Hang Caliper body from strut/spring with zip tie.
16) Compress piston to fully returned using same method as front calipers. Remember to check fluid level in reservoir for overflow situation. Remove excess fluid using same method as front.
17) Remove pads and pad clips.
18) Remove caliper support 14mm bolts. Remove caliper support.
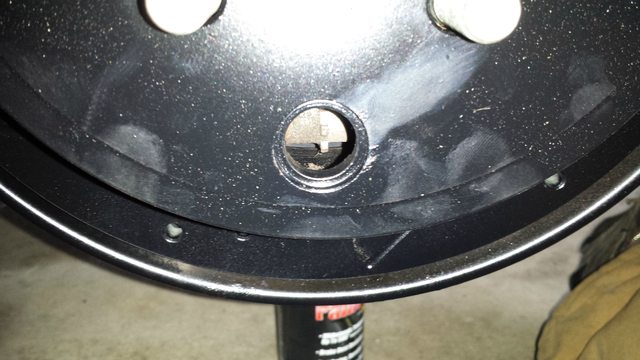
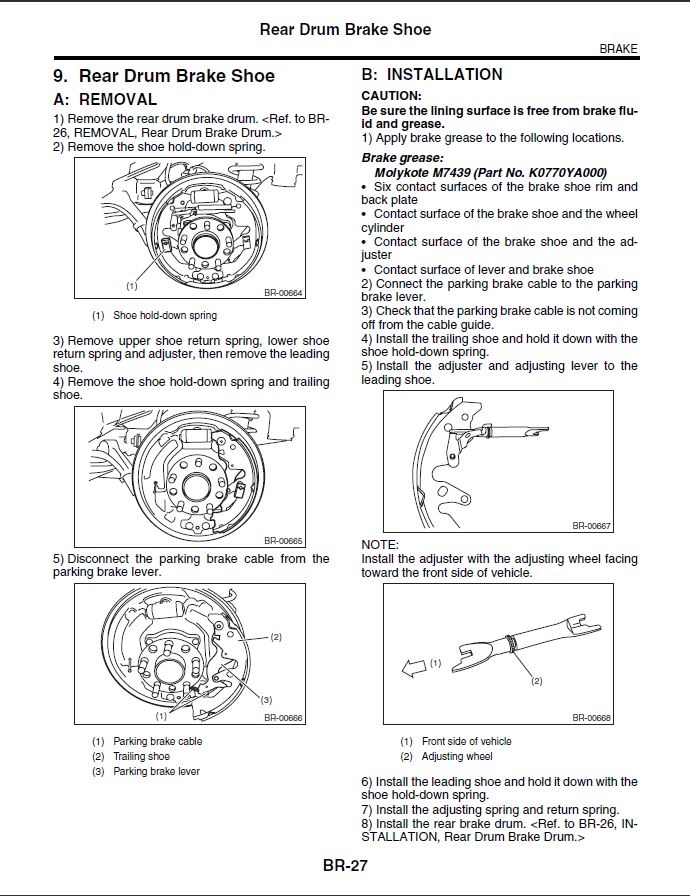
19) Remove rear rotor/drum. Again use the same M8 bolts used in front removal. Soak hub with PB. Light persuasion may be needed as well as heat use same process as front. Unique to rear is inner brake shoes the adjuster must be accessed, and backed off to relieve brake shoes from drum. Remove black rubber plug. Rotate rotor so access hole is centered in lowest possible position. Take flat head screw driver and rotate adjustment wheel up or counter clockwise to loosen.
20) At this point I did not replace the e brake shoes as they still had meat (4 to 5mm) on them and the closest available replacements where in Boston 1.5 hours away. Here is the factory manual procedure for those that are interested.
21) Installation Install rotor.
22) Install caliper support bracket two 14mm bolts torque value: 66 N·m (6.7 kgf-m, 48.7 ft-lb).
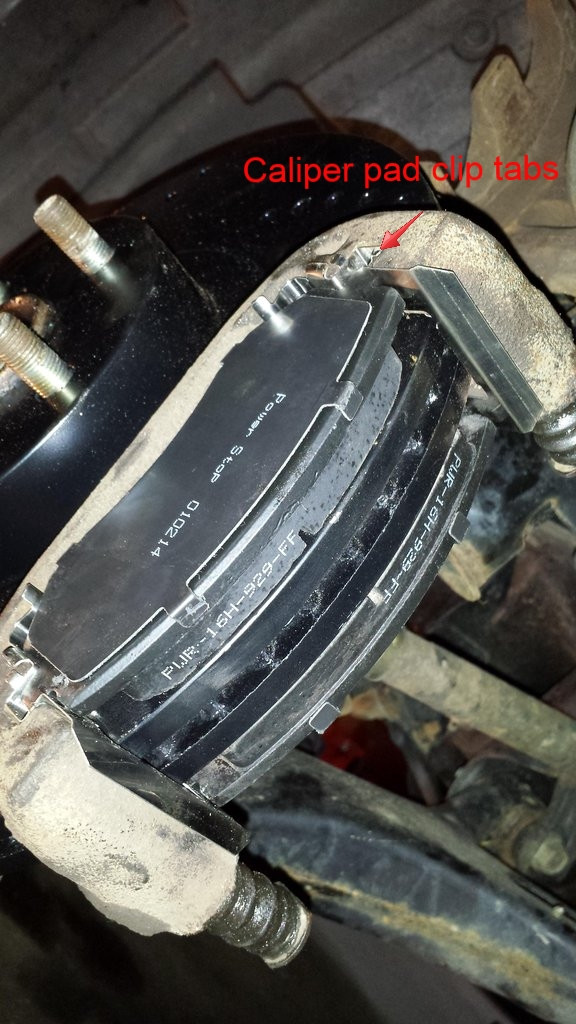
23) Install pad clips. Bend tabs if preferred. Install brake pads. Inner pad always has the indicator. Apply brake quite to pad shims if preferred.
Rear indicator and pad clips tabs
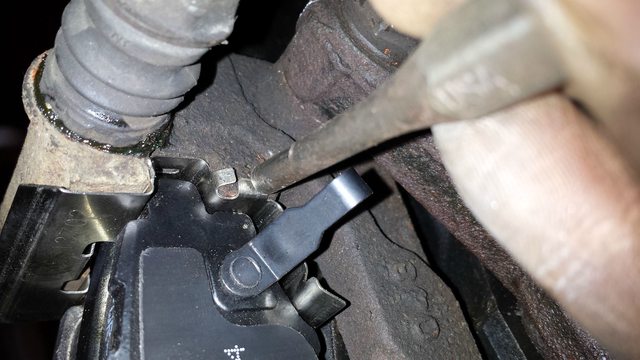
Rear pads installed
24) Lubricate rear caliper piston boot if preferred. Clean, inspect, grease caliper guide pins as done in front procedure.
25) Install rear caliper body. Tighten 14mm bolts, again a wrench may be required to keep guide pin from spinning. Torque value: 27 N·m (2.8 kgf-m, 19.9 ft-lb).
26) Adjust e brake shoes, rotate adjuster to nearest point where drum has drag, back off slightly and your good. This is not a Subaru procedure, just one that has worked well for me in the past.
27) Do a final fluid level check remove fluid if needed. Replace brake fluid reservoir cap.
28) At this point if preferred use white out on bolt heads to ensure they do not loosen after installation.
29) Install wheels. Lower car from jack stands. Torque lugs nuts.
30) Start vehicle and pump pedal a few times until it is hard. If you do not do this the first time you back out of the garage and hit the brakes the car will not stop and well you know what happens next :furious:.
Now Drive! in my case powerstop had a specific break in procedure that activates the resin in the pads and breaks in the new rotor. Worked well. Paint removed from braking surface after just a few stops, I had done this before so I knew it worked.
Hope this helps, a fairly detailed DIY for a simple procedure but figured as a new member I would contribute what I can, it appears that there is not much specific how-to for GH chassis WRX's so hopefully more to come $ pending.
Purchase rotors/pads of choice when shopping take heed to this quote about vented/slotted rotors (tires matter). I choose a set from rockauto for a steal powerstop K4077 w/z16 ceramic pads.
Tools Required: (no air tools option sorry no compressor yet)Davenow;30899353 NASIOC
"BUT MY BUDDY PUT BREMBOS ON HIS WRX WITH WTFBBQ ALLOY PADS, SUPERBUTTSEKS INCREDITAINIUM LINES AND CHUCK NORRIS BRAND FLUID AND IT STOPS WAY HARDER."
No, it doesn't. It has a lot more INITIAL BITE.
95% of people will mistake initial bite and/or decreased pedal travel, for the ability to stop shorter.
A locked tire is a locked tire. And while big brakes can lock a tire without having to push the pedal as hard, stock brakes can still lock the tires instantly if you nail the pedal. Therefor, stopping distance and rate of slowing down, is unchanged.
1/2" breaker bar
1/2" ratchet
3/8" ratchet
19mm 1/2" drive socket
17mm 1/2" drive socket
14mm 1/2" drive socket
14mm 3/8" drive socket
13mm 3/8" drive socket
Flat head screw driver
3 lb. Sledge
3/16" punch or close to w/ at least 6 in shaft
10ml syringe or other small suction device i/e turkey baster
jack/jack stands etc etc
Supplies:
Pads/Rotors (shoes if doing e brake)
PB blaster
Brake cleaner
Disk brake Quite if used
Disk brake caliper lube
Whiteout
Loctite red if used
M8 - 1.25 x 20mm grade 8 QTY 2
Disclaimers: I did not use torque wrench, use one. I did not use loctite suggested for safety. Wear gloves I don't. Paint on braking surface may or may not harm new pads up to you.
Procedure:
1) Lift up the vehicle, and remove the front/rear wheels. OEM lugs are 19mm. I used cross member/rear diff to jack + rocker pinch points for stands.
2) Soak what you can in PB bolt heads, rotor/hub surface etc
3) I suggest work one wheel at a time in case you forget how things go back together especially important with drum brakes!
Start with fronts remove 14mm caliper body bolts. These bolts should remove easily with 3/8" ratchet, the caliper guide pin is keyed to the caliper body so it "shouldn't" spin. Rust changes everything.
4) Open the brake fluid reservoir cap/remove screen. Remove caliper body, some manual compression may be required to loosen. With caliper body removed use a zip tie to hang body from strut/spring.
5) At this point compress the pistons, image shows fully returned pistons. Use channel locks or c clamp with wood or old brake pad. Make sure as you clamp the piston boot is not damaged/folds incorrectly. Once complete check for excess fluid level in reservoir as paint and brake fluid do not get along.
6) Remove old brake pads if not already done. If not choosing to replace rotors be careful to not hurt rotor surface when prying pads loose from pad clip/caliper bracket. Remove pad clips.
7) Remove caliper support. Two 17mm bolts attached to knuckle. Here I removed the lower strut mount bolt for better access to the top caliper support bolt. DO NOT remove the top strut bolt it is for camber adjustment.
19mm strut mount bolt removal
8) Remove rotor. Soak center hub with PB. Use M8 - 1.25 x 20mm grade 8 in threaded holes of rotor body. Some light persuasion on the rotor with a sledge can help bust up rust, heat/PB as well, hit at your own risk damaging hub bearings can occur. Only hit on the flat section adjacent to the braking surface if force is required.
rear rotor shown in image
9) Reassemble. Install rotor. Install caliper support torque value: 80 N·m (8.2 kgf-m, 59 ft-lb). Replace lower strut bolt if removed torque value:155 N·m (15.8 kgf-m, 114.3 ft-lb).
10) Install new pad clips in caliper support. I took a extra step and bent over all the ears on the clips to make sure they did not walk. A punch works well.
11) Install brake pads. Ensure shims are attached. Apply disk quite if preferred. Inner pad always has the indicator attached.
12) Grease caliper piston boots if preferred. Inspect/clean/grease caliper guide pin bolts.
rear caliper support shown
13) Install Caliper Body. Ensure shims do not fall off of brake pad. Tighten 14mm bolts torque value: 27 N·m (2.8 kgf-m, 19.9 ft-lb).
14) Repeat procedure for other side front. Now may be a good time to use white out on bolt heads to ensure they are not loosening after install. It is for me at least as I do not take the time to pull the torque wrench out I just tighten to feel.
Rear pad/Rotor replacement
15) Remove 14mm caliper body bolts. Rear caliper body bolts may require the use of a wrench on the caliper guide pin to prevent spinning, I believe it is a 19mm. Remove caliper body, again some manual compression may be required to help body come off. Hang Caliper body from strut/spring with zip tie.
16) Compress piston to fully returned using same method as front calipers. Remember to check fluid level in reservoir for overflow situation. Remove excess fluid using same method as front.
17) Remove pads and pad clips.
18) Remove caliper support 14mm bolts. Remove caliper support.
19) Remove rear rotor/drum. Again use the same M8 bolts used in front removal. Soak hub with PB. Light persuasion may be needed as well as heat use same process as front. Unique to rear is inner brake shoes the adjuster must be accessed, and backed off to relieve brake shoes from drum. Remove black rubber plug. Rotate rotor so access hole is centered in lowest possible position. Take flat head screw driver and rotate adjustment wheel up or counter clockwise to loosen.
20) At this point I did not replace the e brake shoes as they still had meat (4 to 5mm) on them and the closest available replacements where in Boston 1.5 hours away. Here is the factory manual procedure for those that are interested.
21) Installation Install rotor.
22) Install caliper support bracket two 14mm bolts torque value: 66 N·m (6.7 kgf-m, 48.7 ft-lb).
23) Install pad clips. Bend tabs if preferred. Install brake pads. Inner pad always has the indicator. Apply brake quite to pad shims if preferred.
Rear indicator and pad clips tabs
Rear pads installed
24) Lubricate rear caliper piston boot if preferred. Clean, inspect, grease caliper guide pins as done in front procedure.
25) Install rear caliper body. Tighten 14mm bolts, again a wrench may be required to keep guide pin from spinning. Torque value: 27 N·m (2.8 kgf-m, 19.9 ft-lb).
26) Adjust e brake shoes, rotate adjuster to nearest point where drum has drag, back off slightly and your good. This is not a Subaru procedure, just one that has worked well for me in the past.
27) Do a final fluid level check remove fluid if needed. Replace brake fluid reservoir cap.
28) At this point if preferred use white out on bolt heads to ensure they do not loosen after installation.
29) Install wheels. Lower car from jack stands. Torque lugs nuts.
30) Start vehicle and pump pedal a few times until it is hard. If you do not do this the first time you back out of the garage and hit the brakes the car will not stop and well you know what happens next :furious:.
Now Drive! in my case powerstop had a specific break in procedure that activates the resin in the pads and breaks in the new rotor. Worked well. Paint removed from braking surface after just a few stops, I had done this before so I knew it worked.
Hope this helps, a fairly detailed DIY for a simple procedure but figured as a new member I would contribute what I can, it appears that there is not much specific how-to for GH chassis WRX's so hopefully more to come $ pending.
Last edited by a moderator: